ALCOSIM Setup Instructions
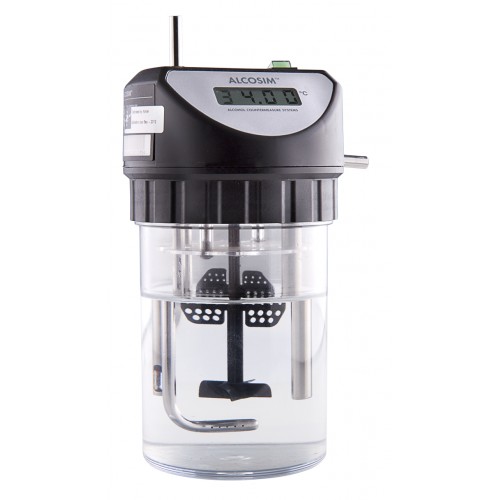
The ALCOSIM™ breath alcohol simulator and Alcohol Reference Solution (ARS) are used together to calibrate the various breathalyzers and ALCOLOCK™ branded ignition interlocks that we provide. This method of calibration will save you time and money and also provides you with the comfort of performing it indoors, even in the comfort of your own home. Calibrating your breathalyzer with the ALCOSIM will ensure its sustained accuracy and longevity.
If you’re planning to calibrate your breathalyzer or ignition interlock device in the USA you will need our North American ALCOSIM Kit.
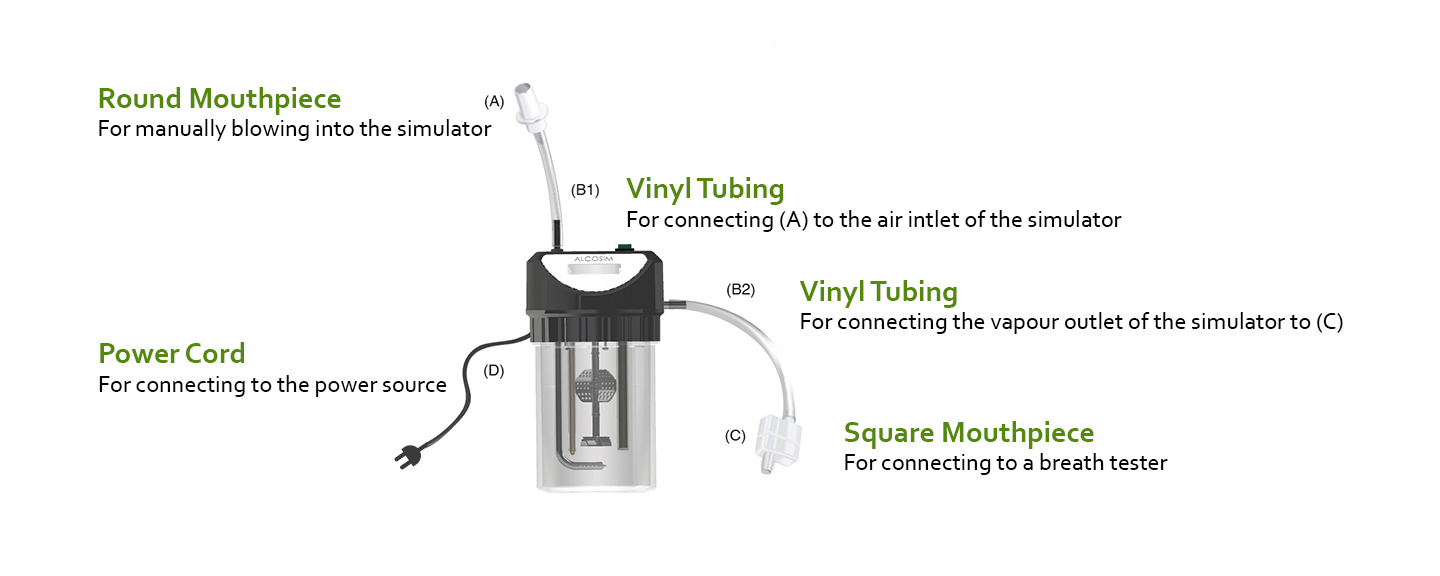
View the diagram below to ensure proper connection:
ALCOSIM Setup and Operation
Step 1: Disconnect from the power source
Make sure the simulator is not connected to a power source (D).
Step 2: Separate the top housing from the solution container
Turn the top housing counterclockwise and detach it from the solution container.
Step 3: Add the solution
Open a 500 mL bottle of Alcohol Reference Solution (ARS) and fill the solution container up to the marked line. Each bottle of ARS comes premixed in different concentrations, depending on the device. Refer to your Calibration Manual for the specific concentration your device requires.
Step 4: Attach top housing to the solution container
Return the top housing onto the solution container and make sure not to tighten it too much.
Step 5: Connect tubing
Connect the vinyl tubing (B1) with the round mouthpiece (A) to the ALCOSIM air inlet and the other piece of tubing (B2) with the square mouthpiece (B) to the vapor outlet.
Step 6: Leak check
Perform a leak check by covering the square mouthpiece (C) and blowing into the round mouthpiece (A). Air bubbles should not appear. If air bubbles appear, please refer to the “Troubleshooting” section of your Calibration Manual.
Step 7: Connect to a power source
Connect the ALCOSIM simulator to the power supply (D).
Step 8: Switch the simulator ON
Switch ON the simulator. The LCD display will illuminate and the propellers should rotate. Cold is displayed until the solution reaches 32°C, at which point the simulator will display the actual solution temperature. Our simulators are designed to keep the temperature constant (34°C ± 0.2°C). It takes about 10 minutes for the solution to heat up. When 34 °C is displayed, the simulator is ready to provide a breath sample.
NOTE: Instructions may vary from unit to unit. Please consult your Calibration Manual for further information.
Appendix for Safety and Precautions
- The ALCOSIM simulator should be used by trained personnel only.
- Ensure the device is unplugged during the setup procedures.
- Use the simulator indoors. Keep it at room temperature (23°C± 5°C) with no prolonged exposure to sunlight. Avoid direct contact with hot surfaces and heating elements.
- Ensure the environment is free of any toxic, flammable or, explosive substances
- Ensure the container, vinyl tubing, and mouthpieces are completed dry before performing a calibration. Even trace amounts of liquid can obscure breath test accuracy.
- Should the simulator heat up beyond 34°C, turn the device off immediately and allow it to cool down.
- Allow 10-15 minutes of cooling time after disconnecting the simulator from the power source before detaching the top housing.
- Dispose of the alcohol reference solution at the end of the day.
- Keep the simulator at 5-40 °C temperature and at 10-85% relative humidity.
NOTE: For more details on safety and precautions, please refer to the ALCOSIM Calibration Manual.